Intro to esp32
ESP32
Espressif microcontrollers (esp32 and esp8266) are great when you need a very low power, simple solution for reading either digital or analog input and/or turning an external device on/off. They have built-in wifi/bluetooth, very low power usage (< 0.1W), and can be programmed with MicroPython (or Arduino). I use the ESP32 most since it has multiple 12 bit ADC pins while the ESP8266 only has a single 10 bit ADC. They can be easily programmed with Arduino (C/C++) or microPython. My preferred language is microPython since it allows similar code to be copied between a Raspberry Pi and ESP32. However, it is a little slower when running microPython vs C++. For most of my projects it is not noticeable and the convenience of microPython is worth it. (Stepper motor project is one scenario where C++ may be a better option)
Most my projects will have a esp32/MicroPython (I use μpython for shorthand) option along with the RPi/Python code. uPython includes a small subset of Python libraries to make beginner projects easier. For more advanced projects some adjustments to the code will be needed. See python vs upython section. At minimum you will have a boot.py and main.py that run when the esp is powered. But you still have the ability to write packages/modules, store them on the esp in a /lib folder, and then import them into your main.py (ie you can create adc, motor, servo modules and import them for use in main)

Compared to RPi
The ESP32/ESP8266 differ from the Raspberry Pi in a couple ways.
- It has no O/S. Instead the bootloader allows you to load your micropython program to the ESPxx where it will keep running as long as the ESPxx has power.
- At minimum you will have a boot.py and main.py. Both get loaded when the esp is powered. The boot typically has minimal code to finish the boot process. But the variables defined in boot are accessible in main.
- ESPxx also have analog in pins (ADC) for directly measuring voltage vs a digital, binary signal (lo/hi or 0V-3.3V). You do not need an external ADC like the Pi requires. When using a pin as an input always confirm you are not exceeding it’s voltage range (esp32/Rpi is 3.3V max, esp8266 analog is 1V). If your input is greater than this you need a voltage divider (logic converter if going from 5V-3.3V)
Download microPython Firmware
- First download the micropython firmware .bin file from https://micropython.org/download/
- Select the Espressif board you’re using. Then the latest, stable GENERIC .bin file. (SPIRAM version is if you need access to extra memory).
Make sure your micro USB cable has data lines. Many thinner cables are charge only. I use a micro USB to DIP and USB solder socket connector to check continuity on the D+/D- pins.
Programming the esp
Next steps covers 2 options for installing the upython firmware on your board and programming it using an IDE.
Option 1 Thonny IDE
Thonny has been the easiest to setup (comes installed on RPi) and a reliable IDE with an easy connection to ESP32. I’ve had the best luck with the most recent version of Thonny 3.3.3+ (default on 32bit RPi OS). The older version I have problems connecting to esp32 sometimes. I noticed 64bit Ubuntu installed 3.3.4. So depending on your system this has what worked for me.
NOTE - RPi OS (32bit) Thonny comes installed as 3.3.3+ and extra steps not needed. If using RPi OS skip to installing esptool/firmware below.
Additional steps for non-RPi OS
- Install Tkinter dependency
$ sudo apt install python3-tk - Ubuntu (64bit)I first tried
$ sudo pip3 install thonnyBut did not work completely. Then tried$ sudo apt install thonnyand had 3.3.4 - Another option is try
$ bash <(wget -O - https://thonny.org/installer-for-linux) - On non-RaspberryPi OS install you will likely need to add your user to the dialout group to have access to the serial port (USB) for programming the esp. But you can hold off and see if you get the error later. Otherwise use
$ sudo usermod -a -G dialout $USERto add your use.
Install on RPi OS lite
(Thonny not pre installed) Can install with $ sudo apt install thonny, check $ thonny --version and make sure 3.3.3+
Install esptool and upython firmware
- Once installed open Thonny and Install the esptool package under under Tools/Manage plug-ins.
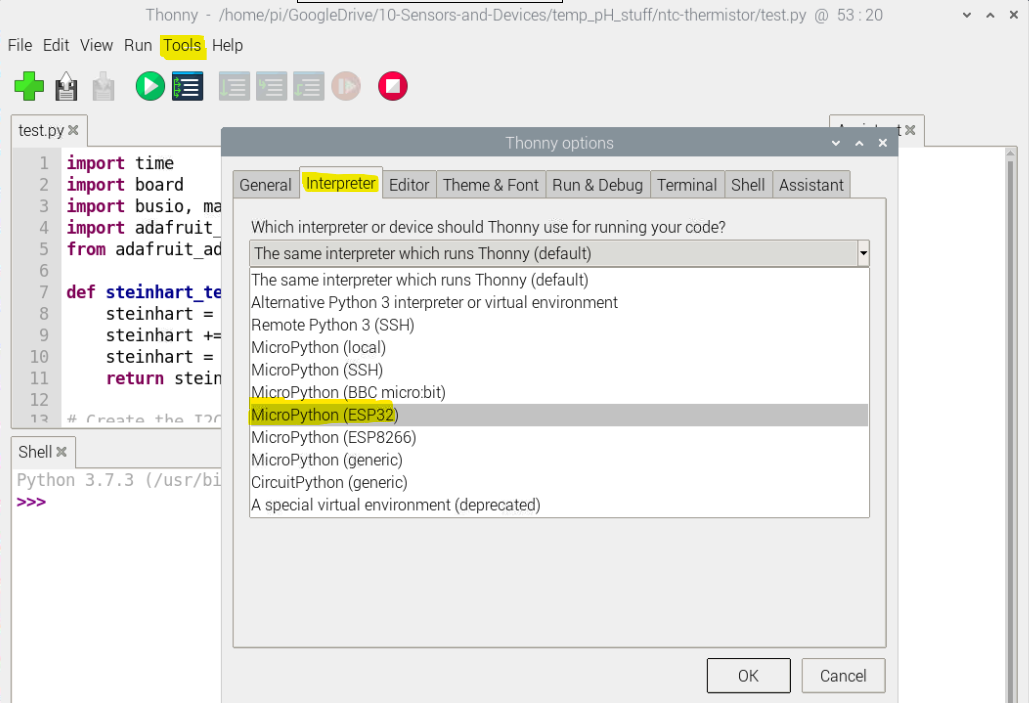
- Then go to Tools/Options/Interpreter and you can select the ESP32/ESP8266 option.
- On the same page you can select the option to Install or update firmware using the .bin file you downloaded.
- You can confirm the port by plugging/unplugging the ESP32 and hitting reload. Or
$ ls /dev/tty*showed CP2102 USB to serial converter. - Select Install Once upython is installed you can select the interpreter under Run for esp32.
Also use Stop/Restart backend, ctrl-C, Ctrl-D to alternate between programming (should see the command line »>) or to run the program. You can not program it while it is running.
Thonny has a nice file manager system to easily create directories on the esp32 and download/upload between your local Pi/PC.

Option 2 VScode-Pymakr
Another option that has the advantage of working with VScode is Pymakr. But there are more steps to setup. I would start with Thonny/RPi and move to Pymakr only if you have started using VScode and familiar with extensions (or if you do not have a Pi).
Install esptool
- Connect the esp32 to the USB port and confirm you have access to the tty ports.
- Install esptool
$ python3 -m pip install esptool - Check access with
$ esptool.py read_mac - If you get ‘access denied’ then try adding your user to the dialout group. Your user needs to be in the dialout group for access to serial ports.
-
$ groups(will show you what groups your user id is in) - To add your user - Use the usermod command with -a (add) and -G (groups) on dialout
$ sudo usermod -a -G dialout $USER- Then completely logout and log back in
- Check access with
$ esptool.py read_mac - If still having problems here are some extra checks from github
- Add your user to the tty group with usermod command
- Change ownership of ttyUSB0 with chown
$ sudo su$ cd /dev/-
$ chown $USER ttyUSB0Install mPython Firmware
Once access to the esp32 is confirmed with esptool.py install the micropython firmware (.bin). For esp32 can use these commands from upython.org to first erase the flash and then program the firmware. (replace esp32xx.bin with the .bin file you downloaded)
- esp32 ->
$ esptool.py --chip esp32 --port /dev/ttyUSB0 erase_flash - esp32 ->
$ esptool.py --chip esp32 --port /dev/ttyUSB0 --baud 460800 write_flash -z 0x1000 esp32xx.bin - esp8266 ->
$ esptool.py --port /dev/ttyUSB0 erase_flash - esp8266 ->
$ esptool.py --port /dev/ttyUSB0 --baud 460800 write_flash --flash_size=detect 0 esp8266
Pymakr Setup
Setup Pymakr for coding
- Identify the manufacturer of the esp board (will be needed later in Pymakr)
- In windows look at the manufacturer description in device manager
- In linux type
$ lsusb - To confirm the port (in linux) can type
$ ls /dev/ttyUSB*(plug/unplug to see what is added) - Install VScode and node.js
- Inside VScode install the Pymakr extension
- Open global config file pymakr.json (can use All Commands at bottom to find Global Setting)
- For auto detect blank the address (“address”: “”) and confirm “auto_connect”: true,
- Under “autoconnect_comport_manufacturers” enter the manufacturer from earlier steps (Unknown manufacturer listed at bottom)
- Example of mine
"autoconnect_comport_manufacturers": [ "Silicon Labs", "Pycom", "Pycom Ltd.", "FTDI", "Microsoft", "Microchip Technology, Inc.", "Prolific Technology Inc.", "Cygnal Integrated Products, Inc.", "Unknown manufacturer" ] -
sync_file_types will have files that can sync to your device
- Restart VScode
- My pymakr continued to show ‘Connecting to /dev/ttyUSB0…’ and was running the code pre-existing on the esp32. But the Pymakr Console option in the bottom menu updated with a check mark. At this point I could do Ctrl-C to get to a upython prompt »>
- You’ll want to be in a local folder to upload/download code between the esp32 and your PC.
A great resource is at randomnerdtutorials
Helpful Commands
Some Helpful Commands To get basic information on esp device. From a command line on the Pi it is connected to. $ esptool.py read_mac
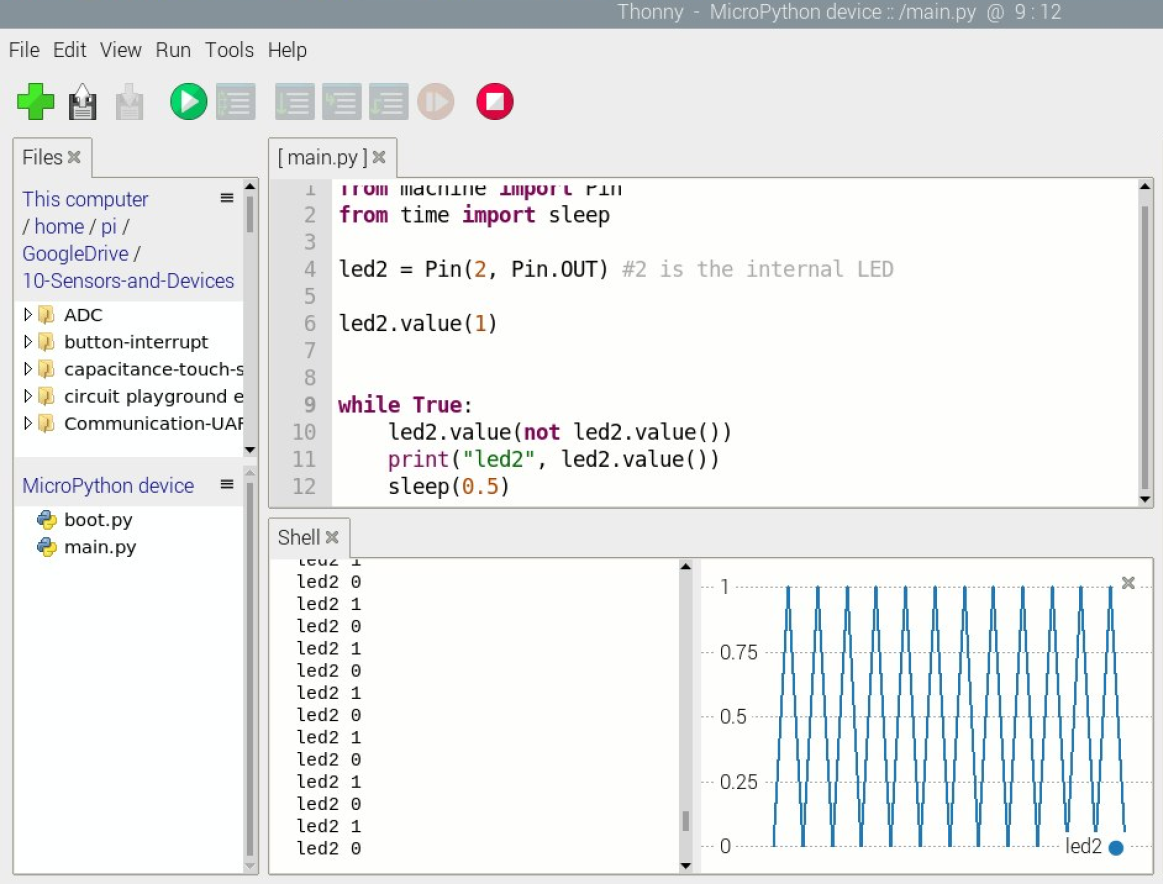
If using Thonny - Under “View” turn on “Plotter” and “Files” so you can see the files on your PC vs the files on your ESP32. You should see a “boot.py” on the MicroPython device. You can use the Thonny menu items on the esp32 directory menu to upload/download files between your Pi and the esp32. You can also check storage space on the esp32.
Other method for listing files, change directories, etc. using uos library. Can also be incorporated in your code. Use single quotes ‘name’
>>> import uos
>>> uos.uname()
>>> uos.listdir()
>>> uos.chdir('/dirname')
>>> uos.getcwd()
>>> uos.mkdir('/lib')
>>> uos.rmdir('/test')
>>> uos.rename(from, to)
To check free memory, RAM (gc - garbage collector). RAM is used for running the program (variables, wifi, TCP/IP). ESP8266 will be a little over 30k and ESP32 around 110k. You can do things like using integers instead of float to save memory. But for smaller projects with the ESPxx boards I have not had issues running out of memory.
>>> import gc
>>> gc.collect()
>>> gc.mem_free()
105900 bytes (~106Kb) or
>>>baseline=gc.mem_alloc()
>>>gc.collect();print('\n\nUsed RAM:{:>6} Free Ram:{:>6} Net used:{:>6}'.format(gc.mem_alloc(),gc.mem_free(),gc.mem_alloc()-baseline));gc.collect()
Flash memory for storing micropython and your .py files is separate and will be in the MB range
Quick program to make the ESP32 onboard LED blink
- Create main.py program
- Save As, Select MicroPython device and name it main.py
- Now you should have boot.py and main.py on the MicroPython device folder
- Run main.py
main.py
from machine import Pin
from time import sleep

led2 = Pin(2, Pin.OUT) #2 is the internal LED

led2.value(1)


while True:
    led2.value(not led2.value())
    print("led2", led2.value())
    sleep(0.5)

Thonny has a plotter that will also plot the 0, 1 from the print statement. (You can print multiple variables on a single print line)
Other useful commands are under “Run” at the bottom of the menu. Send EOF/Soft reboot is useful for rebooting the ESP32
Using Thonny to write programs in microPython and upload to ESP32 has worked best for me. If wanting to do C++ then Arduino is a good IDE. Some ESP32’s required me to hold the “boot” button when uploading code in Arduino. Once the terminal says “Connecting” you can release the boot button.
Commands inside Thonny To change esp32 directories in the upython command line
>>> %cd /dir
>>> %cd ..
Manually installing esp32 tool
$ pip3 install –upgrade esptool (or)
$ python3 -m pip install esptool
To erase flash
$ esptool.py --chip esp32 --port /dev/ttyUSB0 erase_flash
To program the firmware
$ esptool.py --chip esp32 --port /dev/ttyUSB0 --baud 460800 write_flash -z 0x1000 esp32xxx.bin
(on non RPi machines you may have to modify dialout group. My Thonny gave instructions when I got the error)
sudo usermod -a -G dialout $USER